The West Coast Trail will forever hold a special place in my heart.
I embarked on this epic 75 km trek with a group of fellow trekkers that included my dad, my best friend and her dad, and three of our dads' friends. We had no idea, standing at the trailhead in Port Renfrew on our first day, the adventures that would befall us, the amount of mud that would be caked on our clothing, how much our hip bones would hurt every morning, and how absolutely unforgettable every moment would be.
Before I dive into what to expect on the hike itself, let's start with some history and logistics.
History of the West Coast Trail
Construction on the West Coast Trail started in 1889 as part of an international communication system called the Red Route that connected the British Empire in North America to India via an undersea cable. The trail was built by telegraph linesmen who had to string up wire along the coast for communication.
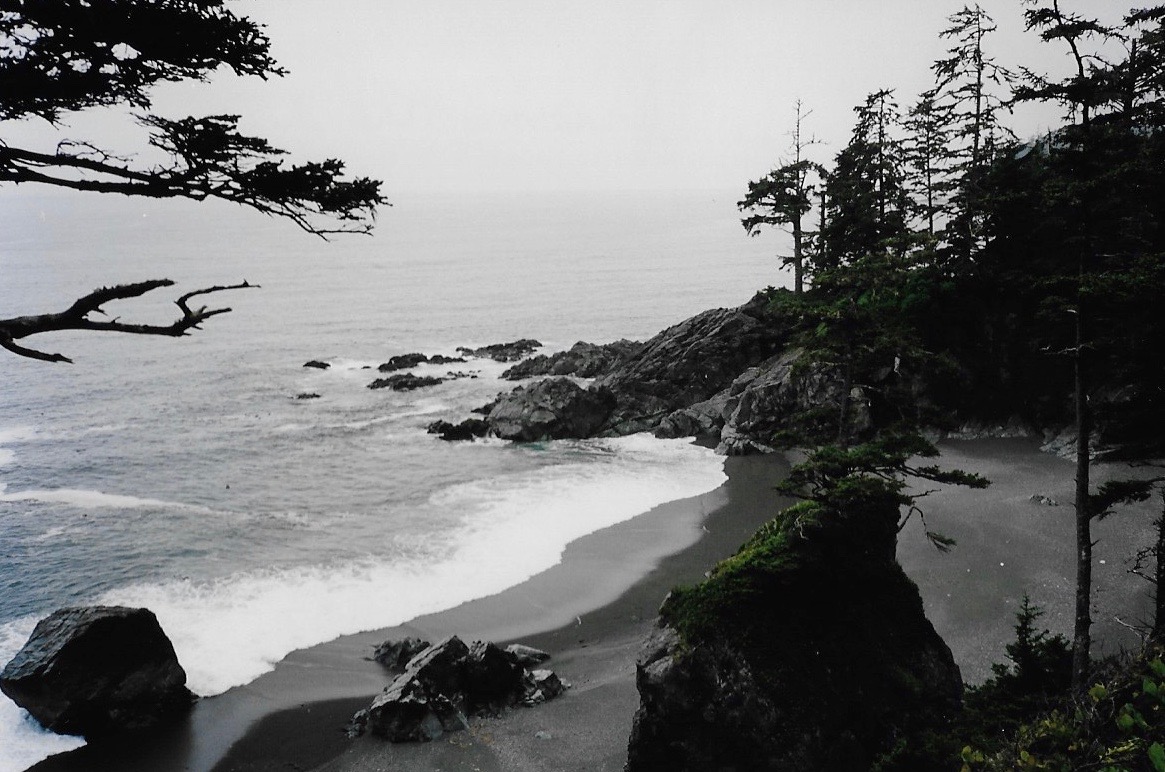
The region became known as the "Graveyard of the Pacific" because more than 50 ships have gone down all along the rocky coast — almost one ship per kilometer! When you are hiking along the beach you can see some of the wrecks at low tide, and there are often anchors, buoys, and other rusted pieces of ships washed up on shore.
In 1907, the trail started to be widened and cleared in order to help rescuers reach the otherwise unreachable stretch of coastline to try and assist shipwreck survivors. Because of how isolated the trail is and how hard it is to get in and out (you literally have to carry everything on your back), there are still rusted tools left along it from this construction that took place more than 100 years ago!
Maintenance on the trail stopped in 1954 when technology made it obsolete as a life-saving trail and it became overgrown. Then, in 1969, Canadian Parks Services sent a crew in to re-open it in anticipation of adding it into the third phase of the Pacific Rim National Park.
And the rest, as they say, is history!
Over the years, there have been incredible improvements made along the trail (considering that EVERYTHING has to be packed in), including the installation of hundreds of ladders, platforms, landings, and more.
It is now a world-class trek that attracts hikers from all over the world.
But not just anyone can hike the West Coast Trail whenever they want. Oh no, access to the trek is heavily regulated, and that leads me to....
The Reservation System
You can only hike the West Coast Trail if you have reserved your spot using Parks Canada's reservation system online or through the call center. In order to prevent overcrowding and cut down on environmental impact, only 75 overnight hikers are allowed on the trail at any time. So, spots are limited and fill up fast. There is a reservation fee of $24.50 per person.
You can show up at one of the trailheads and register in person on the standby list, but there is no guarantee that you will actually make it on the trail, as it could take days before there is a cancellation or a no-show.

West Coast Trail Facts
LENGTH: 75 km (5-7 trekking days)
OPEN: May 1 – September 30
MAX GROUP SIZE: 10 people
FEES: $127.50 per person (permit) + additional ferry fees to get you to the trailheads
ORIENTATION: It is mandatory for all hikers to attend an orientation session. This can be attended the day before your reservation. You will receive a waterproof map of the trail at the session.
STARTING POINT: You can start from Pachena Bay (near the town of Bamfield) in the north, or Gordon River (near the town of Port Renfrew) in the South. A mid-access point at Nitinaht has recently been added if you are looking for a smaller, less intense taste of the trail.
West Coast Trail Packing Tips
Parks Canada has a great packing list on their website, but I thought I'd include a few tips from my own experience for you too.
The weight of your pack should only be about 25-30% of your body weight at the beginning of the trip. And that includes full bottles of water. The load will lighten throughout the day as you drink water, and throughout the trip, as you eat your food and the fuel for your stove gets used up. My pack started out at about 40 pounds and ended at about 35.
Bring all of the blister-combating things you can think of.... ALL OF THEM (and on that note, make sure your hiking boots have been extremely worn in before using them on this trek)
Also, consider the other areas of your body that will rub. The skin on my collarbones, hips, and lower back was rubbed raw by the end of the trip from the waist belt and shoulder straps on my pack.
Rain gear — including a waterproof pack cover — is your friend. The weather can change in an instant, and you can't slow down for it.
Gaiters are probably the one must-pack-don't-forget-invest-in-really-good-ones item I would recommend. The terrain is crazy out there — sandy beaches, rocky shore, mud (SO much mud, see photo above), and you want to keep all of that out of your shoes and off of your legs.
You may go an entire day without finding a water source, so you will have to carry enough water to get you through it. There are water sources at all recommended camping sites along the trail, but these could take you 13 hours of hiking to get to. Make sure you have enough water bottles with you to keep you hydrated and don't forget to bring a water pump and filter.
You'll need rope to hang your food at night to keep the cougars and black bears away.
Toilet paper (and a ziplock bag to pack it out) is a necessity — there are no bathrooms in the wilderness!
A warm change of clothing and comfortable shoes for the end of the day. You will need to take your sweaty, dirty hiking clothes off when you stop for the night and give your feet a rest from your hiking boots.
You will need to have, and know how to read, tide tables. Some of the trail runs along the shoreline and you don't want to get trapped.
A Brief Overview of What My Trek Looked Like
My group of seven began our hike from Gordon River in the South. We arrived in Port Renfrew a day early to complete our orientation and make sure that we could get an early start on our first day.
DAY 1
13 km to Camper's Creek
The men in our group about to board the water taxi that took us to the trailhead.
I started full of energy and felt like nothing could slow me down — and then I hiked for 5 km straight up and felt like there was no way I was going to make it. Okay, it wasn't straight up, but with that 40-pound pack on my back, it sure felt like it was.
There was knee-deep mud in spots (thank god for gaiters), but the scenery was gorgeous — old growth forest, ferns, moss, and the intoxicating smell of cedar. We crossed narrow bridges (basically just giant tree trunks) laid over ravines and shallow gorges and climbed up and down ladders bolted to rock faces.
The view of Camper's Creek from the cable car — after a 13-hour grueling day, this was the most beautlful view I had ever seen in my life.
We reached Thrasher's Cove at about 1 pm and decided (though Park's Canada recommends stopping here on your first day) to press on the 8km more to Camper's Creek. This stretch was full of wooden boardwalks, ladders, and fallen-tree-bridges, and then finally the human-powered cable car that would deliver us to the creek and beach that we would camp at for the night.
DAY 2
9 km to Walbran Creek
These log bridges were really slippery when wet, and though the ravines below weren't especially deep, they still would have caused a lot of damage if we fell into them.
The rain had turned the trail into a mud pit, but it didn't dampen our moods. We were hiking through the forest again, and there were more boardwalks, a cable car, a huge series of ladders bolted to cliff faces (some had more than 60 rungs!) and a long and slightly scary suspension bridge.
It was one ladder after another at some points on the trail (note how they seem to stretch forever in the background) — not an easy feat with a heavy pack on your back (but kind of fun at the same time...).
This boardwalk ran through an area that had been recently burned in a wildfire. It made for a beautifully eerie bit of trekking.
Our campsite for the night. The waves echoed off the cliffs behind us which made it sound like we were surrounded by the ocean while we were sleeping.
The last hour of this day almost killed me. Everything ached — everything. But, the reward was a sunny evening at our campsite, which happened to be nestled amongst driftwood on the beach overlooking the ocean.
DAY 3
15 km to Dare Point

Most mornings started off misty or with a light rain — hence the reason rain gear is one of my packing suggestions.
The hike on day three was a total switch because the majority of it took place on the beach! There was varied terrain — sand (not so fun with an additional 40 pounds on your back), flat sandstone (definitely easier), and large rocks (so much more delightful).
I definitely got distracted by the tidal pools that were full of starfish, purple sea urchins, and colourful sea anemones.
We made much better time along the beach than we did in the forest, and it wasn't long before we had come upon the Carmanah Point Lighthouse and the Hamburger Hut that was located on the part of the trail that is a Native American Reserve. You can bet that we shelled out some serious cash for that over-priced burger and it was the most amazing thing I have ever tasted!

We had to climb off the beach at kilometre 37 because that area is impassable — makes for a fantastic view though!
After a brief rest, we continued along the beach, encountering a light mist at Cribs Creek that gave the coastline an air of mystery, crossed surge channels, and climbed a ladder to the kilometer 37 marker and then back down to Dare Point Beach. The beach was our home for the night and had some of the softest sand that I have ever felt in my life.
DAY 4
13 km to Tsusiat Falls
Yet another breathtaking view along the West Coast Tral. We actually saw whales just off the coast from this viewpoint.
Maybe I was just getting used to long, grueling daily hikes, but this one felt like it went pretty fast. The first part of the hike took us through the forest again and over boardwalks, up ladders, and on a ferry crossing at Nitinat Narrows (the Narrows must be crossed by boat — there's no way around it).
After taking in the view from some pretty impressive cliffs, we found ourselves back on the beach. After about an hour of trekking, we made it to our destination for the night — Tsusiat Falls.
Nature's most breathtaking shower — Tsusiat Falls.
This absolutely stunning waterfall falls from a cliff right onto the beach and is one of the busiest camping areas on the trail. The best part is that it is the perfect natural shower (make sure to pack your biodegradable soap!) and there was nothing like the feeling of rinsing off four days of sweat and mud while standing under that stunning natural wonder.
DAY 5
8 km to Tsocowis Creek
With a coastline like that, you can see why it would be so hard to approach the shore by boat!
We had a slow start to the morning, enjoying the falls, the beach, and some whale watching. The hike started off inland on boardwalks, through some mud pits, and high above the ocean with amazing views. Part of the hike took us back onto the beach as well, and when we had made it to Tsocowis Creek in the early afternoon, we decided to call it a day and enjoy the sunshine.
There's nothing better then spending a day on a stunning, sunny beach, and the coastline atTsocowis Creek did not disappoint!
We spent the rest of the day relaxing on the beach, swimming, and exploring the tide pools. Who needs Hawaii when you have the West Coast Trail?!
DAY 6
17 km to Pachena Bay
We started the day on the beach, which was a bit treacherous because the rocks were wet (I only fell once). Once we had hit Michigan Creek, we headed back into the woods, pausing to visit the lighthouse at Pachena Point. They were selling fudge and I couldn't buy it fast enough — it was a much-needed sugar rush.
My dad and I just minutes away from finishing this epic trek!
From there it felt like a walk in the park after the five days that we had just had! A very deceiving start for people beginning from the Pachena Bay/Bamfield end of the trail. But, it was a nice way to end the epic six days that we had spent together.
Is The West Coast Trail Really That Hard?
The short answer? Yes.
It is a grueling trek that you should not attempt unless you are in shape to do it. You are truly isolated, and if you get hurt, it can take up to 24-hours for help to come (if they can reach you at all). You are contending with wild, rough, and unpredictable terrain that can force you to move painstakingly slow (the first day we moved about 1 km every hour). Plus, you are carrying a heavy pack for long hours on multiple days with tired, sore muscles.
This is a quote from my WCT bible Blisters and Bliss: A Trekker's Guide To The West Coast Trail:
“Remember that, despite trail improvements, once you step off the boardwalk, the West Coast Trail is still the same grueling trek that [has always been]. It is an isolated, prolonged and strenuous trek, that is physically challenging and potentially hazardous.”
But, if you are well-prepared and ready to take on any obstacle that is thrown in your path, you will have an epic adventure that you will remember forever.
In other words, it is SO worth the pain.
Resources
Ready to plan your trip? Awesome!!
Here are some great resources to get you started:
Parks Canada West Coast Trail Guide
Blisters and Bliss: A Trekker's Guide To The West Coast Trail (this book was my bible)
Related Posts
Travel Tales: Trekking Up Mt Etna, An Active Volcano In Italy
Why Maligne Canyon in Canada Will Make You Want To Head North For The Winter

Meet The Author
Lindsay Shapka is an avid traveler and the creator of The Anthrotorian — a website dedicated to sharing travel tips, stories about adventures, culture quirks, artists you should know, fascinating bits of history, and more!
She is also an artist, marketing specialist, editor, and freelance writer who has work featured on websites, blogs, and in magazines like National Geographic Traveler.


When I was first asked by some fellow foreigners in South Korea if I wanted to get naked in a public bathhouse and sauna on my first weekend in the country, I looked at them like they were nuts.
Somehow though, they managed to talk me into it (I blame severe jet lag), and it was one of the best decisions that I have ever made.